Accessing the Admin Portal. Before configuring Recognition:
-
Log in to your Admin Portal. All Recognition configuration is done from here.
The setup happens in two phases:
Phase 1 – Handled by Your CSE
-
Your CSE will activate Recognition for your company, so the feature becomes available for all eligible users.
-
Configure peer-to-peer settings and help you connect Gifted if you want recognitions to include points or gift cards.
-
Set up your reward policy – only if:
-
Your company doesn’t already have a rewards system, or
-
Recognition is new to your existing rewards policy.
-
Once Phase 1 is complete, you can move on to the HR-managed configuration.
Phase 2 – HR Configuration in the Admin Portal
Admins set up:
- Point allocation rules
- Message and gift card templates
- Automatic recognitions
- You can also send One-Time Recognitions for ad hoc events.
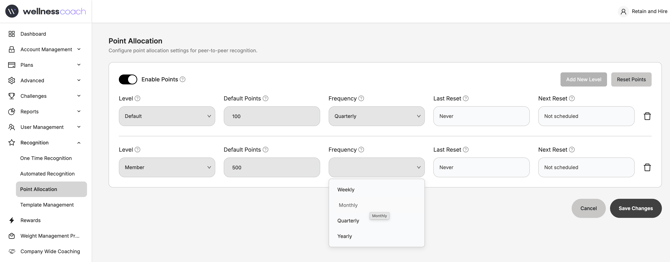
Step 4: Point Allocation for Peer-to-Peer Recognition
Purpose:
Point Allocation determines how many points employees receive to give to their coworkers when sending peer-to-peer recognitions.
-
In the Admin Portal, go to:
Recognition → Point Allocation -
Click Add New Level.
A drawer will open. -
Configure the level:
-
Job Title / Level:
Select the job title or level this point allocation applies to. -
Points:
Enter how many points employees in this role receive to give to peers. -
Frequency:
Choose how often points refresh (e.g., weekly, monthly).
-
-
Review the reset information:
-
Last Reset
-
Shows the date and time when points were last reset for this level.
-
Displays “Never” if points have never been reset.
-
-
Next Reset
-
Shows the scheduled date and time for the next automatic reset based on the selected frequency.
-
Displays “Not scheduled” if the frequency is set to Never.
-
-
-
Click Save Changes.
-
All users assigned to that job role will automatically receive points—to give to coworkers—based on the selected frequency.
-
Points are always credited on the first day of the chosen cycle.
-
-
For brand-new setups, use Force Reset:
-
This immediately distributes points to all applicable users in the configured roles.
-
-
Set a Default Role:
-
This is important for users whose job title may be missing in the database.
-
Ensures everyone receives an appropriate point allocation and lets you vary amounts by company level or job title
-
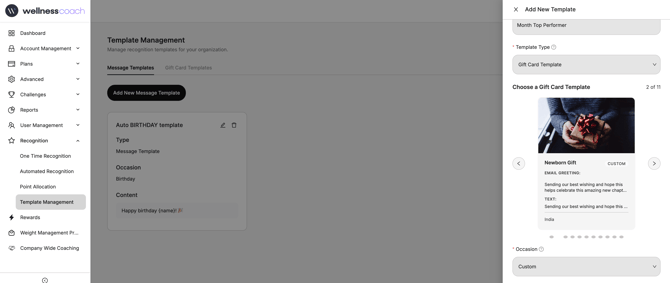
Step 5: Template Management
Purpose:
Template Management allows you to create preset messages and gift card layouts that employees will use when sending recognitions.
-
In the Admin Portal, go to:
Recognition → Template Management -
You will see two template types:
-
Message Templates
-
Gift Card Templates
-
How to Create a New Template
-
Click Add New Template.
A drawer will open. -
Template Name
-
Enter a unique name for the template.
-
-
Template Type
-
The type will be pre-selected (Message or Gift Card) based on where you clicked.
-
You can change it if needed.
-
-
Gift Card Templates (if selected)
-
Recent gift card designs from Gifted will be visible.
-
Select the design you want—this is what end users will see when they receive a gift card.
-
The gift card value is configured later when:
-
Creating a recognition, or
-
Setting up an automated recognition.
-
-
-
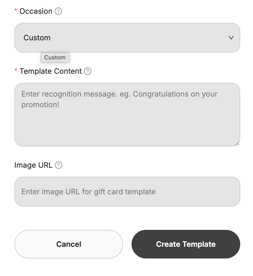
Occasion
-
Choose an occasion for the template:
-
Birthday
-
Work Anniversary
-
Custom
-
-
This helps filter and organize templates later when configuring automations.
-
-
Template Content
-
Add the message content for the template.
-
This content appears in system-generated emails or posts.
-
Note: This applies to system messaging—not the content provided directly by Gifted.
-
-
Click Save to finish creating the template.
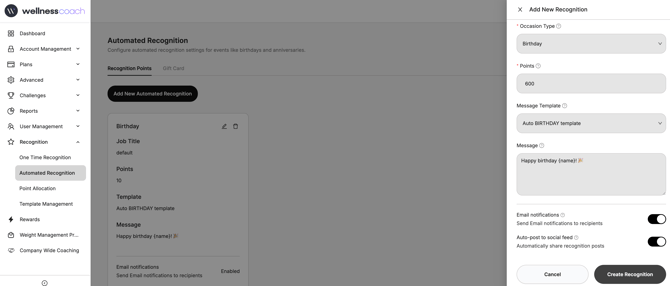
Step 6: Automatic Recognitions
Purpose:
Automatic Recognitions let you celebrate employees automatically for recurring events like birthdays and work anniversaries.
-
In the Admin Portal, go to:
Recognition → Automated Recognition -
Click Add New Recognition.
-
Configure recipient targeting:
Job Title > Select the job title. >The receiver’s job title should match this role.
-
Set the Occasion Type:
-
Choose Birthday or Work Anniversary.
-
For Work Anniversaries, you can set the milestone year (e.g., 1 year, 5 years, 10 years).
-
-
Set the Reward:
-
Choose the points and/or gift card amount the employee will receive.
-
-
Optional: Select a Template
-
Choose a template created in Template Management to personalize the recognition.
-
-
Add the Message
-
This will be included in the automated recognition.
-
-
Choose the Communication Mode:
-
Email
-
Post (note: posts are public)
-
-
Click Create Recognition Type to save and activate the automation.
If you manage multiple enterprises, select the appropriate enterprise and repeat the setup as needed.
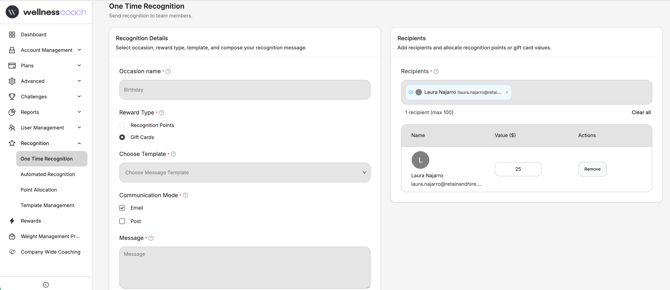
One-Time Recognitions
Purpose:
Use One-Time Recognitions for ad hoc or day-to-day events, such as a special project, a big win, or a timely achievement.
-
In the Admin Portal, go to:
Recognition → One-Time Recognition -
Fill in the details:
-
Occasion Name
-
Describe what the recognition is for (e.g., “Q3 Sales Win”, “Team Launch Success”).
-
-
Reward Type
-
Choose to give wellness points, a gift card, or both.
-
-
-
Optional: Select a Template
-
Choose a template from Template Management to keep your messaging consistent.
-
-
Communication Mode
-
Choose Email or Post.
-
-
Add your Message
-
This is what the recipients will see.
-
-
Add the Recipients
-
Type their names or email addresses to select the users.
-
-
Click Send Recognition.
-
Your one-time recognition will be delivered instantly.
-