To ensure the highest level of security for your data, the Wellness platform uses SSH Key Authentication for SFTP file transfers. Instead of a standard password, this method uses a pair of cryptographic keys: a Public Key (which you register in our portal) and a Private Key (which you keep securely on your own system).
In this guide, you will learn how to:
-
Generate your SSH Key pair.
-
Add your Public Key to the Wellness Portal.
-
Automate transfers using an HRIS or manual client.
-
Troubleshoot common connection issues.
Step 1: Generate your SSH Key pair
Follow the steps below based on your operating system:
Option A: Windows (using PuTTYgen)
-
Open PuTTYgen (included with the PuTTY suite).
-
Set the "Type of key to generate" to RSA or Ed25519.
-
Click Generate and move your mouse in the blank area to create randomness.
-
Save your private key: Click "Save private key" (save as .ppk). Keep this file secret.
-
Copy your public key: Highlight and copy the text in the box labeled "Public key for pasting into OpenSSH authorized_keys file."
Option B: macOS or Linux (using Terminal)
-
Open your Terminal and run:
ssh-keygen -t rsa -b 4096 -f wellness_sftp_key
-
This will create two files on your current directory:
-
wellness_sftp_key (Private Key — Do not share!)
-
wellness_sftp_key.pub (Public Key — This is what you upload to us)
-
Step 2: Register your Public Key in the Portal
-
Log in to your Wellness Portal.
-
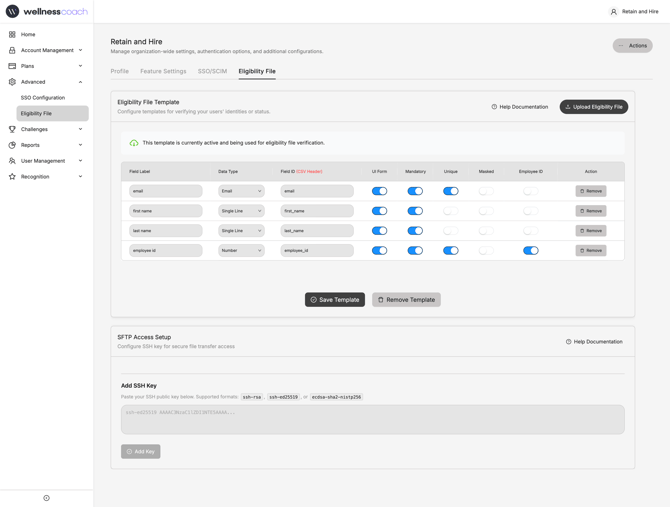
Go to Advanced > Eligibility File.
-
Scroll down to SFTP Access Setup section (This section will be visible only if you have an Eligibility File Template enabled.
-
Paste the string you copied in Step 1 (it should start with ssh-rsa or ssh-ed25519).
-
Click Add Key.
If you want to add more public key follow these steps
-
Click Add New SSH Key.
-
Paste new key in the form and click Add Key
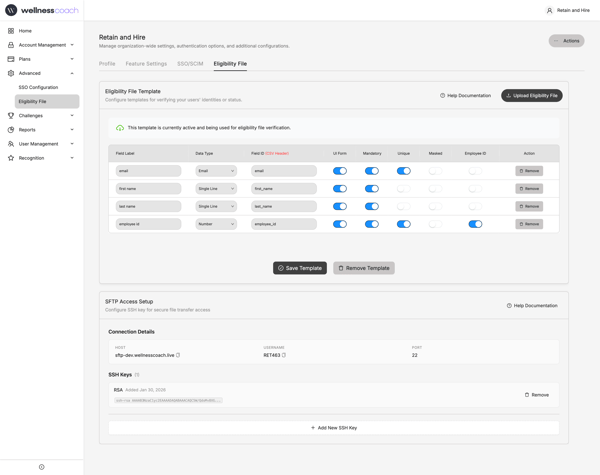
Note Connection Details displayed on this screen; you will need it to connect.
Step 3: Choose Your Connection Method
Method 1: Automate via HRIS (Recommended)
Most modern HRIS platforms (Workday, BambooHR, UKG, Sapia, etc.) can automatically push data to us.
-
Host: sftp.wellnesscoach.live
-
Port: 22
-
Authentication: Select SSH Private Key.
-
Key Upload: Upload the Private Key you generated in Step 1 to your HRIS configuration.
-
Schedule: Set your export to run daily or weekly as needed.
Method 2: Manual Upload (FileZilla / WinSCP)
-
Protocol: SFTP (Port 22)
-
Logon Type: Key File
-
User: [USERNAME]
-
Key File: Select your .ppk or OpenSSH Private Key file.
Method 3: Manual Upload From Command Line (Linux/macOS)
You can use a simple command to upload from your own server:
echo "put /path/to/local/file.csv" | sftp -i /path/to/wellness_sftp_key USERNAME@sftp.wellnesscoach.liveTroubleshooting (Q&A)
Q: I am getting a "Permission Denied (publickey)" error. What should I do?
A: This means the key pair doesn't match. Ensure the Public Key saved in our portal is the exact partner to the Private Key you are using in your software. Also, double-check that your username is spelled exactly as shown in the portal.
Q: My connection keeps timing out. Is the server down?
A: No. This is almost always a firewall issue. Ask your IT team to allow outbound traffic on Port 22 to sftp.wellnesscoach.live.
Q: Why can't I just use a password?
A: To protect sensitive health and employee data, we strictly prohibit password-based logins. SSH keys provide significantly better protection against unauthorized access.
Q: My HRIS says the "Private Key Format is Invalid." How do I fix this?
A: Some systems require the "OpenSSH" format instead of PuTTY's .ppk format. In PuTTYgen, you can go to Conversions > Export OpenSSH Key to save your key in the format your HRIS requires.
Q: Can I have multiple people or systems sending files?
A: Yes! You can add up to 5 different Public Keys in the portal. This allows different team members or automated systems to have their own secure access.