Locate Challenges in the Admin Portal: On the left sidebar, click Challenges. You’ll see two main options:
-
Activate a Challenge — use this when you want to start a brand-new challenge.
-
Activated Challenges — this is your library of challenges that you have already launched, including challenges currently running and ones completed in the past.

Launch a Challenge in 7 Steps
Go to Challenges → Activate a Challenge.
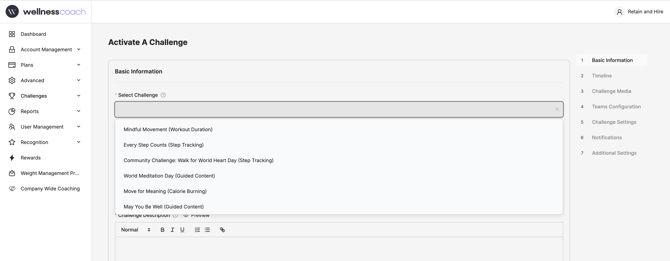
Step 1: Complete Basic Information
Browse and select the challenge template in the gallery. The dropdown will display the name of the challenge along with its category. Additionally, we offer a Challenge Catalog to make it easier to select the most suitable challenge. Click here to view the Challenge Catalog
Categories Options listed here:
-
Steps Tracking: Step challenges measure the total number of steps completed each day, recorded via fitness tracker synchronization or manual entry (if allowed). To ensure all movement counts, two conversion methods are available. The Activity Minutes to Steps method uses a standardized chart to convert time spent in activities like cycling or fitness classes into estimated steps. Alternatively, the Calories Burned to Steps method converts active movement into steps at a rate of 15 steps per 1 active calorie, excluding resting calories.
-
Guided Content: Challenges that focus on completing designated audio or video content within the app. Some challenges may combine multiple categories of content. For example, sleep and meditation sessions for a mental wellness challenge, or fitness classes and nutrition content for a healthy lifestyle challenge.
- Calories Burned: Challenges that measure the number of calories expended through movement. Data is collected by syncing a compatible device.
- Workout Duration: Challenges can measure the total minutes of physical activity completed each day. Activity minutes can be captured by syncing a fitness tracker or through allowed manual time entry.
Select the template you’d like to use.

Challenge name, Challenge Summary and Challenge Description will be pre-determined for you.
You’re always welcome to edit and personalize them if you’d like. However, we highly recommend leaving the challenge summary as is. Our expert team has crafted it to clearly explain the challenge and ensure participants fully understand what it’s about. Once you are done, click next.
2. Add prizes and rewards for your challenge participants.
Only the gift description is required - title and icon are optional. Use the text box to write the prizes you will like to promote.

Step 2: Timeline
Set the duration: decide how long the challenge will run.-
-
The visibility date is when the challenge first appears on users’ home screens, allowing them to view and join.
-
The start and end dates mark the actual period when the challenge is active. Once you click on these options, a calendar will show up. Pick up dates. Click next.
-

Note: If you picked a challenge that has a pre-determined duration, like "Elevate Your New Year in 5 days Challenge," the period will be preset. In this case, for 5 days.
Step 3: Challenge Media
-
A default image will be provided, or you can upload your own banner using the recommended sizes listed below.
-
Apply enterprise branding (optional) by checking the box to automatically overlay your logo, creating a branded challenge image that reflects your company’s identity. Click Next

Step 4: Teams Configuration
Allow users to join pre-created teams for collaborative competition. Team members can work together towards shared goals while maintaining individual progress tracking.
-
Start by selecting Yes or No. If you click No. Participants will participate as individuals.
-
If yes, you’ll have a few customization options:
-
Choose how team scores will be calculated: either Cumulative, Average, or Balanced Score. To learn more about which method works best for your team, click on "Learn more and see examples" right in the Portal.

-
Decide how participants will be assigned to teams. From the drop-down, you can let users pick their own team when joining, or you can auto-assign them to keep things balanced.
-
Set a maximum number of participants per team.
-
Under Team Details, create and personalize teams with creative names, avatars, and even images to make the competition more engaging.
-
💡 Tip: Click the info icon anytime for more details on each setting for all seven steps.
Once you are ready, click Next
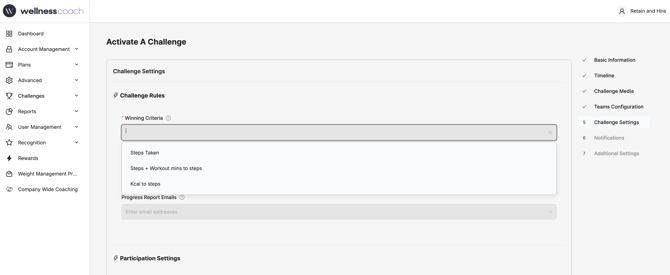
Step 5: Challenge Settings
-
Select Winning Criteria; Decide how winners will be determined. Options vary by challenge template and may include the highest score, most sessions completed, or other measurable achievements. It depends on the type of challenge you picked in step 1.
-
Pick How Rankings Are Displayed; Choose the way user rankings will appear to participants.
-
Choose Progress Report Emails; Decide whether you’d like to receive regular progress reports to track challenge activity.
-
Set Participant Limits (Optional); Tailor participant settings to your challenge type.
-
For on-demand challenges, decide whether progress counts when participants finish a session or simply attend a session.
-
For step challenges, set the daily step limit and choose whether manual logging is allowed.
-
You can also decide whether to allow past session tracking.
-
5. Set Up Communication Settings: Decide how participants can connect during the challenge.
-
Enable a global chat where all participants can communicate. YES or NO.
-
Enable team-specific chats so team members can interact with each other. ON or OFF.
-
Choose whether to allow chat notifications. These can be managed at the challenge level, and participants always have the option to mute them individually.
Step 6: Notifications
-
Configure reminders; you can send participants a daily notification about the challenge.
-
Simply check the box to enable reminders, then select the time.
-
Notifications are sent at each participant’s local time, ensuring everyone gets them at the right moment.

Step 7: You’re Almost There!
Let’s review the final additional settings before launching your challenge.
-
Social Sharing: Decide whether to enable social sharing. When enabled, participants can invite colleagues to join. You can also add any terms and conditions to align with your company’s internal policies.
-
FAQs: Configure how challenge FAQs will be displayed so users have quick access to helpful information.
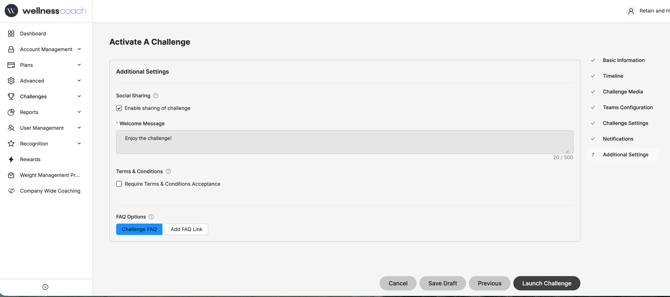
3. You are now ready to clicl on "LAUNCH CHALLENGE"

Note: If there are any errors in your setup or missing fields, you will get a notification like the one below:

👍 YOU HAVE SUCCESSFULLY LAUNCHED A CHALLENGE

👉 DON'T FORGET TO SHARE THE CHALLENGE
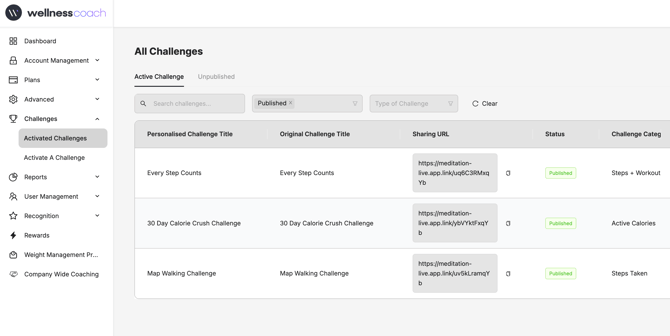
For your team to be able to join the challenge and participate, go to:
Activated Challenges> All Challenges page.
In here, identify the challenge you would like to share. In the table under the column "Sharing URL," click on the copy icon. Now you can share that link in your emails, Slack channels, MS Teams, or any internal communications channels available in your company.


Managing Active or Past Challenges (Activated Challenges)
Once you launch a challenge, you’ll be redirected to the Active Challenges page. Here, you can manage all of your active and unpublished challenges.
-
Search or filter by name to quickly find what you’re looking for.
-
Access the sharing URL; this lets you invite people directly to join the challenge, include the link in flyers, or turn it into a QR code to help promote participation.
-
When you locate the challenge you want to manage, open the action menu (the three dots) for these options:
-
-
View Challenge Details: see participation rates, duration, and settings.
-
Modify Settings: adjust goals, dates, or other parameters.
-
Clone Challenge: copy a successful challenge to reuse later.
-
Lock or Unlock: control who can view and join the challenge.
-
Manage Participants: add or remove participants.
-
Send Messages: communicate directly with challenge participants.
-
Export Data: download participation statistics for reporting.
-
Deactivate Challenge: remove the challenge from active status.
-
-
Got questions or facing any issues? Send us a message at support@wellnesscoach.live. We're here to support you all the way!